
TRIUMPH TR2 RESTORATION
The Adventures of Godot

Painting
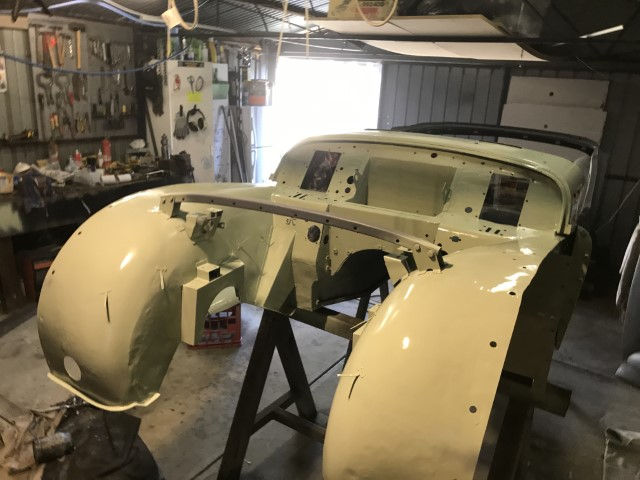
April 2020 First undercoat
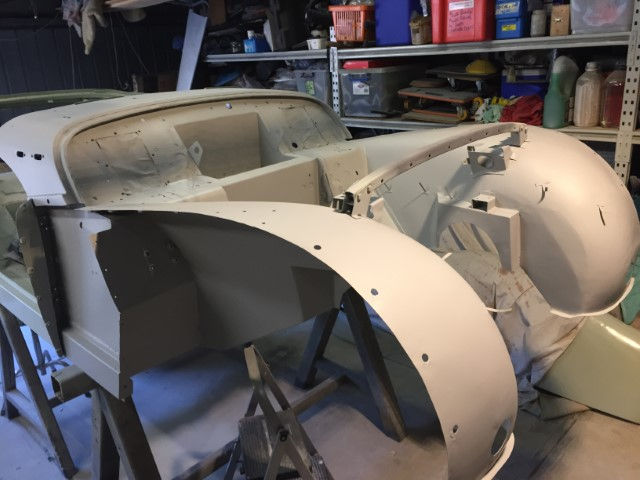
May 2020 undercoat on blocking of engine bay. I did this several times before I was happy with minor panel beating in between
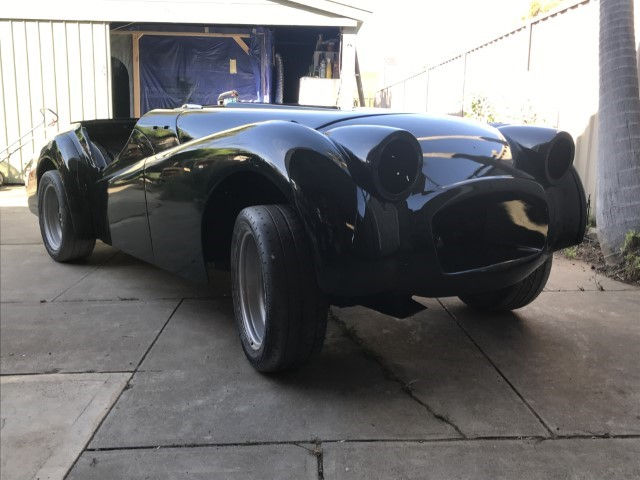
November 2020 the finished product. Got to be happy with that!
April 2020 First undercoat
Thought I would add a page on the trials and tribulations of the painting process and what I have learnt for anyone who cares to know. I am not a professional but I am happy with what I have achieved to date and with some luck will have it completed in the next week or so. As always I have added pictures for those who don't like reading!
If you don't want to read all the stuff below here is the exec summary
1. Decide what paint system you are using before you start. 2 pack, acrylic or whatever but once you start you are committed. Identify your paint source and follow their guidance.
2. There is no substitute for preparation. Decide what you are willing to live with for your final paint and then make sure you do everything you need and more to get there. It is hard work to go back.
3. Make sure you have a clean clear area to paint in. I have seen video of painting in garages but every bit of dust, dirt and insect will conspire against you. Clean the space before you paint and change any masking material when you change colour.
4. Clean your equipment.
5 Decide how you are going to paint your project and stick to the plan. I would have liked to paint all panels on the body but found that my skills in painting vertical panels and the space I had made this difficult.
Be patient in the paint process, allow time for the coat to flash off between coats.
6. Watch video clips on paint preparation, painting, polishing and paint correction as a minimum before you start.
Understand how you are going to paint each item before you mix the paint. Mask the panel so you can see what you are painting when you paint to avoid touch ups which are time consuming.
7. Use masking tape to protect at risk areas when sanding and polishing to avoid those OH Shit moments.
8. Use a Dura block or equivalent system in the preparation. It is the best way to get a flat panel in my uneducated opinion.
Below is the journey of this stage.
First of all I need to say it was not my intention to do the painting as I thought it was worthwhile spending the money to get the job done professionally but unfortunately one of the painters I knew contracted cancer and the other didn't want to return my calls so I decided that as I wasn't able to get someone I knew to paint it I would have a go myself. The process has taken a lot longer than I expected and I probably spent a whole lot more money on paint in particular than I expected and at higher cost than a commercially painter would have paid.
I spent some time doing research to work out the best process and paint and in the circumstances I ended up with little choice. I had originally started using PPG paints for primer and high fill and was happy with these products but when I got to the colour I contacted them and gave them the ICI code (ICI being the original paint supplier) for British Racing Green and my contact at PPG said they would source the colour code but it would take 4 - 6 weeks. After hearing nothing after about 7 weeks including a follow up call I decided to try the forums to locate a source using both the local TR Register forum and the British Sports car forum. I was directed to a paint company with a Sydney contact so I rang them. They could supply the paint but getting paint shipped from Sydney to Adelaide was a bit silly so he suggested I contact the local supplier. He also explained that the Australian branch of the German paint company was in receivership but they had stocks of paint to supply. However the local distributor phone was disconnected so clearly he was out of business. My last resort was to contact a local TR owner with a BRG car and find out who supplied the paint for his car. He gave me the contact for his local paint shop who suggested that I contact their supplier. They were good enough to supply the paint mix so I could get the colour match. Sooo with a source now sorted I needed to work out what paint process I was going to use. The painter I spoke to in Sydney suggested I try a flow coat process which he used to use to paint the black John Player race cars. He also recommended gloss coat instead of base coat and then using clear over. The theory is that a good painter could spray so the clear coat flows to a smooth surface and no polishing is required. After trying to paint the colour coat on some panels I soon learnt that my ambition was clearly exceeding my capability. However this did not affect the basic process rather just meant I was up for a polishing process at the end of it. I did briefly consider a wet on wet process for colour and clear but decided that would probably leave with with orange peel on the first coat and it was not recommended for the clear coat. The paints I used was a De Beer Beromix 2000 gloss colour and a Spralac clear coat. Spralac is a cheaper brand within the DeBeer range and I was told that it was effectively equivalent to the DeBeer branded product. I think this depended on who you spoke to at the shop on the day and I felt I wasn't necessarily getting the best deal from the paint shop but was committed due to colour issue. So to cut to the chase, was I happy with the outcome? You bet, the pictures speak for themselves I hope. However the overriding comment is the painting is the end of a long, long preparation process. When I picked up the primer and filler to start the process my PPG contact said see you in 6 months when you are ready for the colour. He was not wrong. I am sure I overdid the process having first put primer on all panels and then using filler and primer over the top of that and then hi-fill before the final prime before colour with a lot of sanding in between using the Dura block set and hook and loop paper. I would recommend these to anyone considering taking this process on as it allows the large flat surfaces to be made as flat as you are willing to make it. I also bought a powder for the guide coat. I strongly recommend you spend some time looking at youtube clips showing how this is done to fully understand the process you are up for.
Armed with a small amount of knowledge and a whole lot of trepidation I started by flipping the body so I could get easy access to the underbody without having to crawl around and dodging stands. I constructed a frame to hold the door gap and cross brace so I did not distort the A pillar when I flipped the body over. Probably not necessary but after spending 5 years reconstructing the body I was not in the mood to be brave. Flipping the body was easy enough with 3 capable people and I rested the body on high density foam on the front and rear decks. Getting clear access to the floor was important for preparation and quality of paint. I intended to use the gloss colour on the underbody and inside the tub as there was no point in spending money on clear coat. My first crack at 2 pack colour painting worked out well with good coverage and not much in the way of runs. I first painted an anti chip paint under the guards and then sprayed the colour directly over the top of this. Having completed the underbody I then flipped the body back over and worked on the inner tub. This is a time consuming stage to make sure all the corners are cleaned to get good paint adhesion. Also spraying the inner body was difficult to work out a good pattern so I got coverage and minimal runs. I was not overly happy with the outcome of this part but in the end it was all undercover so I moved on to the real job of the outer panels. For this stage I constructed a paint booth to keep the dust leaves and insects out of the paint. It was spring so having the warmer weather was good but it is also very windy and a lot of bugs and of course flowers including wattle which is a brush like flower with fine bristles that drift on the wind. I decided to construct the booth in the shed which in the end was a good move as it is unlikely the walls would have remained intact given the winds we had over the spring. The garage also gave me an extra level of protection against the dust and wind during painting. The booth was simple, I created a wooden frame and covered that with a plastic drop sheet and then clamped that to the roof trusses in the garage. I then put timber on the floor for the sides and cut posts to length between the roof frame and floor timbers to create my sides and then stapled plastic drop sheets to that. I used packing tape diagonally and lengthways to reinforce the plastic. I constructed a separate removeable wall for the front of the booth so I could take that out and move the whole body in when I needed to. For the access door I found a temporary zip door at Bunnings our local hardware chain used for sealing off building site areas. After painting once I ended up in a fog that would not clear so I built an extraction system using my leaf blower which worked well to clear the mist while I was waiting for the paint to flash off.
With the booth constructed it was finally into the painting. First I swept and vacuumed the floor area in the booth and used folded plastic sheet in rolls to cover the work stand to avoid dust blowing off them. I repeated this stage with every paint change. Most panels at that stage was painted in high fill paint so I decided to prime first to ensure I had a consistent base colour. The process was sand hi fill to 600 grade wet and dry, prime, sand to 800 grit, paint colour, sand to 1200 grit and then clear coat, sand wet and dry 1500 to clear all orange peel and 2000 grit and then using a DA sander with a soft 3000 grit sanding disc before polishing with a wool buff and foam pad. I used an aluminium block with an extruded edge to rub any dust or paint runs out. I also used a razor blade to scrape the high points of paint runs out, again tips from youtube are useful. I preferred the aluminium block mostly. This allowed me to take the top off any defects without rubbing the paint off around as I learnt quickly when I tried to rub the paint runs off he first panels I painted. Again this is something you need to youtube before you start to avoid the painful learning process where I had to repaint multiple panels. The other thing I learnt was that the best thing is to protect any edges where you may accidentally rub through the paint by putting masking tape on edges or feature lines. Remove the tape when you get to the 2000 grit stage then remove the tape and rub any defects out carefully making sure not to rub over edges excessively.
I tried painting the front guards with them hanging vertically but I soon found that my painting skills resulted in a lot of paint runs so I then worked on painting as many panels as I could laying flat. This meant I could lay paint on the flat areas and let it flow to get a better finish but there is more risk of getting dust and other product in the paint. This is not a major issue using the aluminium block, not was the runs for that matter. As long as this is not excessive it is not really an issue. I found it better to put more paint on and live with paint runs than painting dry which leaves a great deal of orange peel with the higher risk of sanding through the paint. I also found that painting in areas close to the side of the booth or close to the floor resulted in a lot more dust in the paint so in the end I only painted on the work stands I had which meant 2 panels per process. I could often mover the panel after 4 - 5 hours curing if I was careful so I might get 4 panels painted in a day but that was all.
For the paint process I eventually learnt that being patient during the process was infinitely better than rushing and then having to repaint later. First issue was to identify your masking lines. It is essential to mask areas you don't intend to paint to avoid overspray. I learnt this the hard way when I forgot to tape over a hole in the firewall and found I had primer overspray inside the tub. Of course you never manage to overspray the colour over the primer so it is always the primer that is left. Also it is best to mask so you can see all the area you are painting. On more than one occasion I masked so I was painting an edge underneath the panel and found after that the coverage of that area was inadequate because I did not get underneath and make sure I covered all angles.
After multiple learning efforts I worked on the process of light paint coat and 10 mins flash off time (depending on the paint system), then a heavier coat to ensure everything is covered. Wait 10 - 15 minutes and check before you paint the next coat for dry areas or areas of light coverage or paint runs. The flash off time minimises the risk of runs. I usually painted 4 coats and found this gave me plenty of material to sand in the finishing process. Oh and a word here on the change of coats or colours, re-mask and re-cover anything that has paint on it. I used the rolls of folded paint protection plastic sheet which is designed to catch overspray and it works well. However when I painted the tub I found a lovely fleck effect through certain areas of the tub where I painted close to the sheet. The plastic sheet will release some of the overspray or flakes of paint that will settle onto your paint job. Paint is electrostatically charged when it passes through the gun so it will attract any stray particles. The white primer provided a wonderful contrast to the dark green paint. The roll of plastic cost $20 and I used about 3 rolls for everything. The cost of respraying the tub was about $100 or more not to mention the days lost in sanding and respraying.
Finally the polishing. I left the paint to cure for a week at least in moderate temperatures before polishing. This allowed the solvents to mostly disperse. Full hardness of paint is a 6 month process I have been told but a week allows much of the solvent to clear. I found this stage difficult to get the hang of but I quickly learnt that too much polish is not good. It splatters everywhere and does not cut the surface. Polishing flat panels is now pretty good but the cowl has been a challenge. It has also been hot so the polish is drying quickly making the mop drag and leaving the surface dull compared to other areas. I will leave it a day and try again. I used a single stage polish with a wool buff and foam pad in that order on the advice of the local panel shop supplier and I am really happy with the finish. There is another stage buff that I can use but probably won't. This is a road going car not a show car so why waste the effort.