
TRIUMPH TR2 RESTORATION
The Adventures of Godot


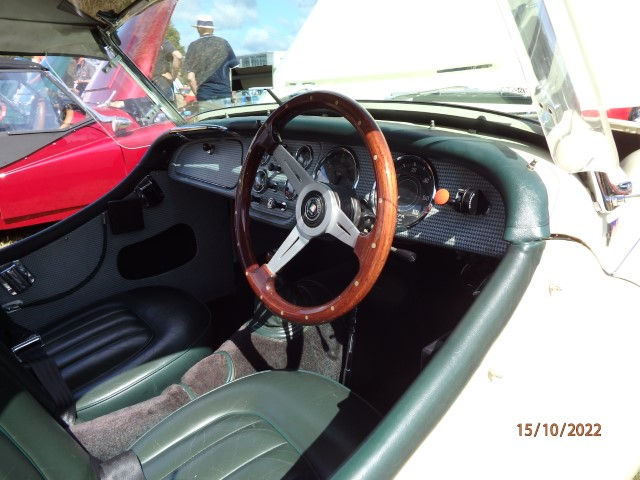
Replacing the instrument panel

The back of the new instrument cluster

Oct 2022 On the way home to Adelaide
Replacing the instrument panel
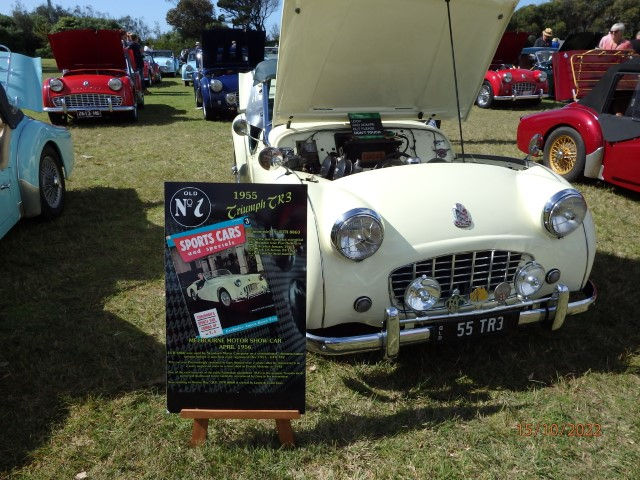
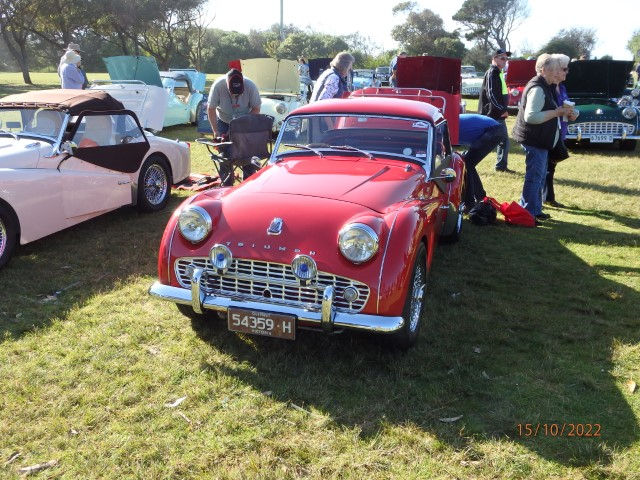
Merimbula Concourse Photos
Current Activity
Nov 2023 added a couple of photos, one from a coffee and chrome event and the other from the Adelaide Climb to the Eagle event recently
October 2023
The last year has been a hit and a miss as I have progressively worked through issues but also had some great drives around Adelaide Hills. I have had to have the radiator repaired multiple times due to recurring leaks but that appears to have been corrected now. Also needed to repaint the front cowl due to a fairly decent rock strike on one of the drives. I am currently working through gearbox issues and have bought a replacement gearbox. I will rebuild the current one as a bearing may have failed. Just waiting to get the flywheel back from the machinist with a bolt pattern to suit the GT6 clutch required for the new box. The new pressure plate is a lot lighter than the old so this should add to the responsiveness of the engine. I hope to get to the next day of Triumph for the TSOASA in a weeks time and also the 'Climb to the Eagle' drive which should offer some great photo shots I hope to add.
November 2022
The Merimbula trip went really well with the only issues being overheating after a full days drive. This was later attributed to a slow radiator leak that I have finally tracked down and repaired after 6 months and multiple radiator removals. I have also fitted a bigger electric fan with a greater volume of air flow and a larger flow thermostat which will also help the cooling. The gearbox also started to jump out of second gear which has deteriorated to the point where the gearbox needs replacing as noted above.
October 2022
Sidescreens are on as well as roof and luggage rack and we are off on the big adventure to Merimbula via Tuross head. We had planned the trip to Tuross over 3 days and then have a week or so there before Merimbula. We were fortunate to miss the rain but there were plenty of serious potholes along the way to make things challenging. We got to Tuross and the rain set in for the next 45 days so the car was parked up in a garage for that time fortunately.
We travelled to Merimbula on Thursday 13th October and the concourse was held on Saturday 15th. I will post a brief video of the the event which was held in glorious sunshine at a park on the beach front and have posted some pictures above. There was a fantastic turnout of about 70 cars on the day not including the hangers on from the local car club.
June 2022
The tacho has been rebuilt and the cable replaced so that is now working beautifully thanks to Don at Adelaide Instrument Repairs at Strathalbyn. He has also calibrated the speedo to suit the new running gear and the cable has been replaced as well so now that is spot on for the speed. I am still waiting for the sidescreens to be returned from the Little Trimmer in Castle Hill. A 3 week job has extended to 3 months now. I have added some draught excluder trim at the front of the doors using some of the leftover leather I have around. The only other thing I need to do is get a luggage rack built.
May 2022
6 months in and still sorting out a few issues. The tacho was working fine once I got the car on the road and then not, so I pulled it apart and got it working again and then it stopped so I pulled it apart etc etc. After doing this about 5 times it finally died so that needed to go to the repair shop. The speedo also worked well for a while and then not so I checked the engagement to the gearbox drive and it was working again and then not etc etc. I have now replaced the worm drive cog as the old one was chewed out. On reflection and talking to the gauge man I think both these issues were caused by the cable drive not being lubricated after sitting for 10 years so I am getting new cables made as both are stretched and have the tacho fixed and the speedo calibrated to suit the new gearbox, diff and tyres. Hope to pick them all up this week as the car is out of action at the moment.
I am also still waiting for the sidescreens to be returned. I think it has been close to 2 months now!!!
Hoping to get a drive in before the weather turns bad although there is always a good day to be had in Adelaide if your are patient.
Will update photos when all the trim is back.
Feb 2022
I have managed to get the soft top and tonneau fitted completely now that I have received the missing fasteners from Spencers. Happy with the fitting other than a crinkle at the passenger side window.
I have two issues I am working on at the moment these being the cooling issue where I lose coolant when it gets a bit hot and consequently keeps ramping up the temperature. I have fitted a coolant overflow bottle temporarily but haven't had the chance to try it out.
The second issue is the leaking petrol tap which I have had one crack at with no luck. Unfortunately I have to drain the fuel tank to take it out. I tried to get a replacement with no luck. My next avenue will be to try putting a small piece of fuel hose in place of the cork which was a solution on one of the forums. Just running down the fuel tank first.
Jan 2022
Happy New Year
In future I will only put my repair and improvement work on this page and leave the front page for the fun stuff. I have sort of missed December which was largely spent waiting for a hood and tonneau to arrive which it did just before Christmas so I started on them late December. Unfortunately I was not sent sufficient number of fasteners to do even the tonneau let alone the hood so I contacted Skinners when they returned to work early in the New Year. I have fitted the tonneau now and after some delay due to the shortages the fasteners were sent but are sitting around a despatch depot in the UK so I may have to bite the bullet and just buy some from the local marine store otherwise I will be waiting another month to fit the hood.
I have also replaced the seal in the speedo drive at the back of the gearbox but I am not sure that was enough to stem the flow of oil as I still have a bit of a drip and now the speedo doesn't work so the cable is probably not engaged. The tacho has now gone out in sympathy because I think there is too much tension on the cable and it is loading the join. The other ongoing issue is a fuel leak from the brand new fuel tap. I have been constantly winding up the adjustment and now the screw slot has sheared off so I will give up on this and go for a junction instead and live without the tap. I have also finally got the trim at the top of the door done but I am not happy with it and will take it to my first preference trimmer to get it repaired and get the side screens in to get covered with the tan material to match the hood.
November 2021
As mentioned on the front page the car is now registered but I still have a few things to do including fitting of seatbelts and getting the trim fitted to the top of the door but all that will happen once I can get it to drive as it should. Once the details are done I will add a few photos to show the finished project.
Mid November Update
Seat belts are fitted and as mentioned on the front page I am waiting on the final bits of trim which are hopefully a few weeks away at most. I have made a bar to replace the front bumper bar with the intentions of using it to mount driving lights. I have an old set that came on the car originally and I am cleaning them up to see how they look before spending $400 or so on new ones. Other than the fine tuning the car goes well, starts easily but it is still to be tested in hot weather. The fan I have is a 830cuf displacement which would far exceed the original belt driven fan but I have had issues previously with overheating prior to the rebuild. Hopefully with the rebuilt SU's we should be good. My options are to get it professionally tuned with a modified jet to better suit the car's performance and/or bigger displacement fan.
October 21
I have been tidying up some bits and pieces while I was waiting for the reply from The road transport department regarding the requirement for inspection. With the knowledge I have now I would have started that process a lot sooner but it has given me time to finish some of the detail. I found that the speedo wasn't working when I did my test drive so I had to sort that out. As suspected it was the right angle adapter coming out of the Triumph 2500 sedan gearbox which can only be accessed by removing the transmission tunnel so out came all the carpet and seats as well as undoing the stereo unit which fortunately did not have to be completely removed. Simply an issue of ensuring the cable drive was correctly engaged. Also tidying up the trim and fitting the old soft top and tonneau so I could get roof bows correctly set up. I need to book in an exhaust place and the inspection for registration early next week as per notes on the home page and I have the trimmer booked. The weather is absolutely crap over the next week with high chance of rain every day but the good weather must be coming so all is looking well for driving in 2 weeks! I have put a little walk around video up but I was dodging trees etc while trying to film it so will do a better one when everything is completed. I also have by new top and tonneau on order so hoping that will turn up before christmas.
Sept 21
Mid September and I now have the car mobile with clutch and brakes now working. I have all trim in place other than finishing items on the doors which I will do when I can get the car to a trimmer. I have fitted the panel in the boot but am waiting on John Skinner trimming in the UK to get back to me on a quote for boot carpet tonneau and soft top but their 48 hours is a little longer than mine! I am now looking to get to the Department of Motor Vehicles to start the registration process in a week or so. I am currently cleaning up the windscreen to get that fitted and will assemble the bonnet over the next day or so and get it fitted along with the guard in the next week. At that time I can get a permit for an inspection.
Aug 21
Late August Update
I received a shipment from the Little British Car Co. in 2 weeks, a record compared to 6 or 8 previously. This had the steering wheel control unit as well as dash gauge lights and hub caps so I was able to finish off the dash board and steering system including the slip ring system. All electrical work is completed and LED lights and indicators working with the LED bulbs to compensate for voltage loss through the slip ring system. I also received the seats from the trimmer and I have installed these after fitting the capping around the passenger compartment and rear speakers in the back panel. After a week off in September I will finish painting the panel with the clear coat and wait for that to cure while I refit the carburetors and finish off the bonnet and boot in readiness of final fitting,
I have made a lot of progress as I have received several parts from the trimmer and also done some parts myself. I have also upgraded the graphite bushes in the slip ring assembly for the indicators and horn and installed a horn relay. I have also managed to get LED headlights after finally coming out of the latest lockdown so I have fitted the front panels and cowl along with the chrome trim I picked up in Sydney a month or so ago. The car is looking a bit more complete but I have just found an issue with one of the front guards where the paint has bubbled after sitting in the sun for a day indicating trapped gas under one of the coats. I will have to sand it back and see where the adhesion issue is.
July 21
End July
As you can see from the photos I now have my panel kit and trim material and have been working on installing this so I could finish the carpet install which is now done. This process is time consuming to make sure you do no damage to material. I have fitted the stereo module that I have made to fit under the battery box so under dash is near complete. I have the slip ring components so will work on that in the coming days so I can finalise the steering column and indicators but I can't install it until I have the dash back in a week's time but it will be good to have the technicalities of this sorted. I have also just received my Motalita wheel courtesy of The Healey Factory who received the shipment this week after being out of stock for months. Good timing. Again the dash is the critical component now. Also managed to get tyres fitted to the rims and the rear guards fitted complete with trim.
Update 7th July. I have been tracking my package of leather and vinyl from the US and it has departed the US finalIy, arrived in Japan departed Japan and arrived in Sydney and departed Sydney so it should be close. In preparation I decided to get onto cleaning up the seats as the vinyl will be used to edge the front of the seat. The seat is the last 'dirty job' as they are rusty and needed to be sanded and painted and I am a bit over doing that but it has to be done. The seats also jammed on the slides and I have replaced the slides with new ones but that did not fix the problem so I did some panel beating on the seat mount faces and that improved it but not to an acceptable level. The mounting area of the seat is deformed and cracked and the holes have been modified many times so I decided to weld 2 mm plates across the mounting ribs. This took a bit of work especially as I was trying not to damage the foam in the hope it will be good enough for the new covers. Ever the optimist. Anyway the reinforcing plates made a huge difference with the seats now sliding evenly and without high efforts so that is a win. I have now primed the seats and will paint tomorrow with the expectation of my vinyl arriving in a day or so when I get out of isolation in 2 days time I am planning to head straight to the motor trimmer.
is now early July and you will have read on the front page that I am in 2 weeks quarantine which is very frustrating as it has delayed some activities which would be the next natural steps such as getting the core plug fitted by someone who knows what they are doing so I could test run the motor before I pulled the dash out for the final trim. I also wanted to get the tyres on the rims so I could get wheels on but that is not a happening thing either.
On the positive side if you have been watching the steering shaft issue I have had my mate repair the shaft by fitting a tube over the offending join after knurling the shaft and the engineer yesterday revisted and has completed the report for the Dept of Motor Vehicles. I have designed the slip ring assembly required to make the control head work and mate is now working on that so once I am out of isolation I will be able to pick that up and assemble it. I am now investigating a steering wheel for the car which will work with the rack and pinion steering. I have also picked up red carpet from the TR register shop in Sydney along with my chrome mudguard trim and have ordered and received snap studs and a tool to fit the carpet so that is underway. I have also created the back board with stereo speakers mounts but I have mdf and would prefer masonite but can't get that either but the patterns are ready to go. Next isolation step is to repair and paint the seats as my panel trim is on the way and I need some trim to edge the seats. Hopefully there will be some dramatic changes in this month and there will be some better pictures to add.
June 21
On the downside over the last month I have to remove the head again as the core plug at the rear is still leaking. Also I had a response from Rimmer Brothers to inform me that the steering column they have supplied is acceptable in the UK so they will not be doing anything about the shaft that I can't use. I responded to tell them that as an ex steering column engineer who has travelled to steering column manufacturers all over the world that the column does not conform to any design rule and is inherently dangerous. I have also sent details on how to make the shaft cheaper, safer and to design rules. In the meantime I have moved on and had my shaft repaired and just need to organise my engineering certificate. I have also nearly completed the wiring but for a few niggling issues as per my notes on the front page and have laid down the insulation in preparation for the carpet. I am heading to Sydney to pick up the mudguard trim as they will not post it and will pick up carpet and a new head gasket at the same time. When I get back I hope my panel kit will have arrived so I can get the dashboard trimmed and finish the final fit our of the dash. As you can see I have the seat covers as well but need to repair the base of the seat around the mounting holes as they have cracked quite a bit. The foam looks in good shape so I am hoping the covers can be done quickly and easily but we all know how that usually turns out.
The next big task is to develop the indicator and horn slip rings on the bottom of the steering column now that is sorted so I can install the original control head.
May 21
First thing is there has been no word from Rimmer Brothers on the steering column issue so I am still in limbo on this matter. As I mentioned on the front page I have had challenges with the motor but nothing that can't be sorted through. I am happy I have resolved all issues except the coolant leak at the back of the head and had I changed it out while I had the head off which would have taken 15 minutes and cost $2 I would not have to go round this again. The problem was I understood the head to be ready to go but I am glad that I have committed to having it surfaced and once the plug is replaced it should be in pretty good shape. In the meantime I have blasted and painted the rims that I bought some years ago. There were some cracks in a couple of them that I repaired, they had been used for racing so they had a hard life but should look good on the car with a metallic silver. I will let the paint cure for a few weeks before getting tyres fitted. The other good news is that my leather seat covers I had ordered from the Little British Car company are now somewhere in Australia and should arrive any day. They took 3 weeks to get from Detroit to Chicago and I know for a fact that is a moderate days drive, but the travel from Chicago to Oz has been a lot quicker. The other good news is that the leather and vinyl for the panel kit is now also on its way after not being available at the time of order. Here is hoping that the colour match is worth the effort.
I have added the video of the motor going, it is actually better tuned now but the sound in pretty good although the idle seems a little lumpier than I expected. I expect some improvement when fully tuned but the cam may be a factor. Still pretty happy though to get to this stage. :) You probably need to click on the music note to unmute the sound to hear the video.
April 21
An update on the engineering inspection noted below. I had bought a rack and pinion conversion complete with column from Rimmer Brothers in order to avoid issues with the engineering inspection. My engineer inspected the rack and pinion conversion and I had removed the spring so he could check for possible bump steer which is all good and the mounting was good. The engineer asked to check the steering shaft so I removed that from the column and to my amazement he found a weld on the steering shaft about 3" above the lower spline. The weld was probably an inch long and had been buffed off quite badly on closer inspection. Welding of a steering component is not allowed under Australian Design Rules so the engineer isn't able to sign off the conversion. I have contacted Rimmer Brothers and am still waiting for a response so I am in limbo until I know if they are going to support their product. I also discovered that under the ADR's the seat belt shoulder mount can't be mounted on top of the wheel arch which is the only practical location if you don't fit a roll cage. The long and short of the story is that as the car wasn't originally fitted with seatbelts I can get the car registered without them and then fit them later as anything is better than nothing, right??
On the positive side I finally got my SU's back after full reconditioning and they look awesome and are now on the motor. Check out the photos.
Earlier in April
At the moment I am waiting for a few things namely my engineer to visit and inspect the rack and pinion steering conversion so I can get an engineering certificate for registration and carburetors from the reconditioners I have left the radiator out to allow the inspection to take place but have had it repaired for the slow leak and had a socket fitted for a electric fan controller. I have also made a mounting system for the alternator after discovering the magnificent mounting I made previously did not work so well when the engine mounting plate was fitted. I now have the alternator in place and fan belt on. I have also fitted the dash and wiring loom and have been working through the random selection of gauges that I have including the fuel gauge which has been adapted for the sender I have.
The fuel tank and rear lights are installed and wiring connected. and the spare wheel seal fitted which provided a few challenges. I am now working on getting a solution for the trim installation and look like I will be getting a Moss kit and having some local help in fitting from a retired trimmer so a month or so will see some very visual progress, I will also fit the radiator and get the motor running once I have the carbys in a week or so hopefully!! This means the front of the car can go together once the motor is done! Exciting times so watch this space.
March 21
We are nearly at the end of March and progress has been steady with the motor now assembled and fitted to the chassis. The fuel line has been installed as has the exhaust which has been modified to fit to the extractors instead of the original manifold. I have installed the body and fitted all bolts without drama and fitted up the steering column and painted and fitted the fuel tank. I have also installed the seat belts and have contacted an engineer to certify the seat belt fitting and rack and pinion steering prior to them being hidden by other bits and pieces. The SU carburetors have been shipped off to Sydney for a 3 week rebuild and I am still waiting 4 weeks later as there is a delay on the polishing process. I am installing a new (old) heater and have found that the plug in the rear of the water pump housing has decided that after 60 years or so it does not want to move so I am getting that drilled out and also getting spacers made to fit the alternator. Consequently all these issues have delayed the starting of the motor although there has been plenty more to do as I scrounge in the boxes of bits trying to locate fittings that may not have existed in the first place. The biggest challenge at the moment is the installation of the brake line from the master cylinder as there is an adaptor between to master cylinder and flare fitting which I can only find one of. I do believe I have brakes when I drover the car previously and can find the line from master cylinder to distributor but not the adaptor and my brake reconditioning place has told me that it is an odd sized they have no idea about.
Oh well challenges abound but we are working through them.
February 2021
As mentioned on the home page there have been some issues during the engine building process and many backward steps. The biggest issue was when torqueing the head bolts down and I was at the final torque setting on stud number 7 when the horrible sensation of feeling something yield. The good news was it was the nut and not the stud in the block but it still is an issue. Was the stud undersized or the nut not hardened? The other issue is that I have lost one head washer and this was the stud with the thinner washer on. I ordered all new washers but there are non in stock at the register at the moment. I am also using an old torque wrench even though it is a quality one. I have removed the stud and ordered a replacement one and some more new head nuts and am waiting for them to arrive and a friend is turning up a had washer to the correct thickness so I turned my attention to redoing the sump gasket. The kit comes with 2 gaskets and I didn't realise until I had fitted one that it was probably for the tractor which most likely had a cast sump so i decided that it was one of those if I don't do it I will probably regret later on so I flipped the motor on the side and removed the oil pan and fitted the thicker gasket. When tightening up the central front screw again I had one of those horrible moments. This time it was teh thread in the aluminium(?) block under the crank supporting the seal. I new the thread was poor but had previously been able to tighten it OK but I had used up my good luck. It already had an oversized screw that may have been jammed into place. Fortunately I was able to get a plug tap and get a decent thread deeper into the block and fit a longer screw successfully. I then went to marry the gearbox to the engine after fitting the clutch but decided to have a read of Bill Piggots restoring TR's before doing that. It was then I learnt of the pin holding the clutch fork to the shaft which has a tendency to shear. This often results in a poor clutch action rather than a total failure so I thought it was a good time to check that. Yep the screw came out leaving the pin in place. However the problem had been identified when I had the gearbox rebuilt a few years ago and a split pin inserted but I wanted to have the original pin in place as well. Belts and braces stuff I know but.... Fortunately the pin dropped out when I was playing around with it so I have ordered a replacement heavy duty pin from the TR Register. And by the way I haven't even mentioned the week I spent to get the cam timing right but that is too boring for even this blog!!
I have now pulled out the clutch cylinder that appears to have not survived the hibernation well as well as the master cylinder so they will be making the journey to South Glenelg Brake and Clutch for a refresh and the SU's are packed an ready for trip to SU Midel in Sydney for a do-over. I didn't realise until I was packing them how worn the pins and linkages were!!
Hopefully we will have more to show in March.
I have now assembled the crank to the block. I did use the seal provided with the crank after getting the instructions which required a modification of the original felt seal retaining plate. I then encountered my next issue when I went to assemble the pistons and found that there was slop in the gudgeon pin bushes which probably contributed to the rattle in the motor. I had a replacement set of gudgeon pin bushes in the kit but this no simple process as the bushes need to be precision bored after being pressed into the conrod so back to McLaren Engineering I went. I am now waiting for the return of the conrods so I have been working on other items.
I wanted to have a stereo system in the car but wanted it to look like it belonged as mush as a modern day system can in a 1950's car and with no major damage to the body. I created a unit which holds the head unit and speakers which can be installed with minimal fuss. I have screwed it to the back of the battery box after drilling an additional to holes to the original stud locations, I have also put to screws through the base of the battery box to support the rear of the head. Once the battery is in place all screws are hidden but the unit can be removed in one piece when the screws are removed. I have also created a new alternator mounting to replace the strange arrangement originally in place where the alternator was suspended at the front of the original generator bracket. The new mounting uses the original mounting bolts but the bracket is extended past the block so the alternator is fully supported with a through bolt between 2 mounting plates to eliminate the possibility of the bracket cracking with vibration. I have checked the clearance to the extractors I have bought. I have seen on one website where a heat shield was installed between the extractors and alternator and I will be replicating this at some stage as I believe it is necessary to avoid cooking the alternator.
I hope to get the conrods back in a couple of days and then we can get the engine assembled and installed in the chassis.
January 2021
Happy New Year to anyone who is actually following this blog. I am now in another Covid 19 lockdown after transitioning through Sydney to catch a plane home in Adelaide. January will be the month of the motor. The camshaft was sent to Ivan Tighe Engineering in Brisbane and has been reground to a fast road cam. I used the cam from the motor even though I I had a spare one given to me. Upon inspection this had been ground already where mine looked untouched. I did measure the crankshaft and this was at bottom tolerance so no room left to go so a new crank is on order for the TR Register along with a 87mm engine kit. The block is at McLaren engineering is getting dipped and a couple of stubborn head studs removed. I am hoping to get this back after my lockdown along with the arrival of the engine kit so I should be able to paint and assemble pretty quickly.
It is now late January and I have my block back from McLaren Engineering, my cam from ITE and the engine kit and crank from the TR Register. I have painted the block as you can see in the photos and commenced assembly. I didn't get too far before I struck my first issue. The new crank has the smooth journal at the front seal which requires a modern rubber seal in place of the felt seal. I received the rubber seal with the crank but discovered that the retaining plates are not part of that kit. I have now ordered that from the Little British Car Co and am now waiting for delivery. I have painted a few other bits and pieces such as the pedal bracket and bonnet spring assembly just to keep things moving. One thing to note. Unless you have a really good place to store parts don't paint them too early or you will do it twice in many cases. As I have moved the car a couple of times things have got scratched and I am redoing the paintwork. Looks like February will be the month of the motor!
December 20
I have sanded and repainted the engine bay and the finished product is an improvement on the previous version thank goodness. I have now stashed the body on the work stands and wrapped and stashed all the panels to avoid damage and moved on to the motor and chassis. I have stripped the motor and found that the engine had been fitted with 85mm pistons and the crank had been ground to death so I am up for a new crankshaft. Thank god for the TR Register who have new crankshafts available. I will be fitting the 87mm pistons to take the motor to 2198cc's and am looking to get a fast road cam to go with the ported and polished head, larger carbies that had been fitted and the extractors. I have taken the block to a local engineering company to be dipped and get a few stubborn head studs removed. I don't expect to see this back this side of Christmas. I will order my engine kit in the next couple of weeks.
I am back on the chassis now and am making new brake lines throughout. I have fitted the back brakes. I am not sure how many rear brakes I thought I had but I appear to have ordered multiple kits to rebuild these over the years! Now onto finish off the front suspension, brakes and steering while I wait for the motor to come together.
As you can see from the photos I have assembled the steering rack suspension and brakes. I have assed photos of the sump and you can see the cracks in the baffle so I have tacked the cracks and it should last another 20 to 30 years at which time it will no longer be my problem. I have also started cleaning the bolt on items for the motor as I have the block out for a clean and I have ordered an engine kit from the TR Register.
November 20
I have added a new clip showing the drivers side after polishing. This has been a slow and painful process as I have rubbed through the paint on several occasions and needed to repaint. I am now learning to use masking tape on the edge of the panels to avoid this and haven't had too much of a drama since. As mentioned on the front page we are now in a 6 day lockdown so this should give me the time to complete the polishing process. Unfortunately I will need to do some work in the engine bay as I painted this too dry and it has a great deal of orange peel and overspray that I will need to rub and polish out. This will be time consuming but not as critical as the outer panels.
October 20
I have constructed a paint booth in the shed to separate the paint from the dust. I did some initial painting and found it a bit hard to see as the mist became very thick so I have made an extraction system that works pretty well. I will add some photos later of this. I have painted a few panels and even though I am getting a bit of dust it is quite manageable. Pity my painting isn't better but I am still getting used to the different paint and the gun so it can only get better I hope. I have painted the underside of the bonnet and boot which went pretty well but the clear coat was another story as it is like painting straight thinners so my technique needs to improve with this. I am also going OK with the finish coat on the flat but when the panel is vertical like the guards it is too wet and I am getting paint runs. Hanging vertical I get less dust so it is the lesser of the 2 evils at the moment. Persistence will overcome!
An update on painting progress. I have mastered the colour coat on the panel laying flat but when I painted the tub I learnt 2 things, the first being you need to wind down the volume of paint especially when you are confined and get the gun too close and when panels are vertical otherwise you get a lot of runs. The second is that when you change colour you change the protective covering especially if you use plastic otherwise the overspray blows off and becomes a nice fleck through the nice dark colour. So the result was I learnt how to rub out paint runs without removing surrounding material and I have rubbed back the whole body and painted again with no paint runs. I am now in the process of rubbing the whole tub and engine bay again with 1200 grit for the clear coat. Photos are a bit difficult in the booth because the gloss level is so high and the booths close that all you see is the reflection of the plastic walls but I have added a video after the colour coat. In a couple of days I will clear coat the tub and engine bay and return the body to the chassis. Now we are getting excited!
End of October and I have painted all the body panels except for the spare wheel cover. I still need to do the roof bows and a few other bits and pieces in the coming week. It has been a big month as I have only been able to paint a couple of panels each time with the space limitations of the paint booth. I will now look at the polishing process so the body is finished and I will remove it and put it on stands while I rebuild the engine and finish the chassis build.
September 20
As you can see I have missed a few months because it was a bit like groundhog day with modifying panels to get gaps correct and rubbing and painting over and over. However the outer body is now in good shape so I have removed all the panels and taken the body off the chassis and flipped it after building a reinforcing frame. I am now in the process of masking the underbody to do a prime coat after tidying up all the bits I couldn't do while sitting under the body. As mentioned on the front page I have my can of British Racing Green and will be painting it myself so watch this space over the next few weeks!
Ok we have finally got the painting stage.after only 6 or 7 years of working on repairing the body but who is counting, I have added a walk around of the painting in the video clip. I am really happy with the gloss on what is a basic preparation on the underside where no one will be looking. A few runs because I laid it on very thick but overall a great result for my first go with this paint and a new paint gun.I have sprayed under the guards with an anti chip compound and overpainted with colour and that has come out well. A good weekend overall after many years of toil!
July 20
I have painted the body and all the guards and high fill primer in the first week of July and will now leave that until I am ready to rub it back with wet and dry in preparation for paint. I have now commences work on the bonnet as you can see being able to strip the sound deadener and old paint and prime it ready for rubbing. Generally it looks pretty good other than a couple of localised deformations but the boot lid is a whole nw story and I will start on that next.
I am talking to PPG about getting the paint code, They atr investigating the British Racing Green for me and will spray out a sample fo r me to look at before we get the paint mixed/
June 20
More of the same of painting filling and sanding. At half way through June I have both the drivers side and passenger side front and rear guards as well as the doors prepped and rubbed to 320. I am now working on the front and rear cowls before launching into the the bonnet and boot. The painting is getting near! Again the pictures show the story.
May 20
Work is progressing well on the panel finishing as I concentrate on the drivers side. I have just completed the rear guard and now working on finishing the drivers door. The pictures tell the story.
April 30
I am now multitasking a bit with some work progress on the chassis with the rear brake cylinders being resleeved. These look great now but I have now removed the motor and transmission from the chassis so when I am ready I can strip it down and get the crank off to the machinists. I have received the tub back from the sandblasters and after a little tidying up I have sealed the joints with sikaflex and put a primer on the body so I can commence with the blocking process. I have ordered a set of Dura Blocks from the US and I have filler and hight fill primer from our local PPG supplier with a bit of help from Paul of Mikutta. It is nice to be doing something other than grinding and welding. As you can see I have primed one of the rear guards and the front 2 guards have already been prepped by my friendly panel beater. There is a little work in tidying up the rear quarter panel and the final guard but at least we are underway.
March 20
As I mentioned on the front page our 6 week trip ended up being 3 weeks but I am now in a 2 week isolation due to Covid 19 quarantine. I haven't got the virus but because I returned from overseas I am automatically required to self isolate so it has given me 2 weeks to make sure the body is ready for blast and to do some other things. I have stripped the front suspension as the paint on that was about 5 years old and now looking a bit worse for wear so I have blasted all components in my hobby booth and repainted all parts. I have also sorted out the fitment of the steering column that came with the rack and pinions steering reversing the firewall mounting plate and welding all holes up and redrilling them to make the thing fit. I am now happy with this. I am also working on fitting the stereo so I can have some music while cruising. I have ordered some insulation mat for the floor and tunnel so I can cut this to shape and check fit the transmission tunnel with this in place. When I get out of isolation next week I hope to be able to get it straight to blast so I can then move on to paint preparation!!
Feb 2020
I have all the panels now fitted with all bolts able to be installed without having to force them into position. Nearly all bolts can be installed by hand so it is quite easy to get the panels on as I am able to put them in finger tight. I am now just tidying up the loose ends such as cutting wiring loom holders that have all mysteriously disappeared from the body along the way. I am also going over all the bits and pieces that I was once happy with but on later reflection still are not quite up to scratch. At the end of this month I am going overseas for 6 weeks so work will once again come to a grinding halt. It looks like the blasting will need to wait until I return unfortunately.
January 2020
I have managed to get a few weeks of concentrated activity over the end of December and January when it hasn't been 40 degrees in the shed. I have been sorting the mounting of the body to the chassis with a couple of issues with the chassis mount on the angled frame of the chassis adjacent to the engine. The only way I could correct this was to cut the mounting plates off the body and rebuild them at the correct angle, This took a couple of goes to get the angle angle correct as well as the spacing from the frame so I could use a standard spacer for the final assembly. It also meant taking the body off and on the chassis a few times which I managed with the help of my friendly neighbour and son in law. While the body was on the trestles I was able to get underneath and weld seams at the rear floor and also finish the firewall and transmission tunnel mating panels. I am have now got the body back on the chassis and on the panel gaps as well as getting the surfaces of the panels to match. I have managed to get the drivers door and front guard matching and now just fine tuning the panel gaps after making quite a few adjustments to the mounting holes on the guard and inner guard. As you can imagine the car has been in a crash or 10 in its time and the front guard has a few battle scars so some surgery was required to get fits and gaps right.
August 19
I have added a couple of photos of the rear guard which has been panel beaten a few times. The metal is extremely thin and difficult to wled and there are multiple holes in the rear corner where the guard has been pulled to get it out. When welding these I am frequently just blowing holes in the metal so I decided the best course of action is to cut out the back of the panel and remake it.
June 19
I have finally completed the rear floor and transmission tunnel area and can move on to something new. I still have to complete the welding to the firewall but will do this when the body is off the chassis and I have improved access. I have now replaced the lower panel of the passenger front guard which went very well with no distortion of the panel and the final shape being close to the door shape after some minor adjustments. The weld took about 2 1/2 hours to complete a 600mm weld to minimise the heat input. I am now welding on the door edge to close down the gaps to front panels. This is the last major repair work I hope.
May 19
as mentioned on the front page May has been the month of the transmission tunnel with a month of fine tuning to get the many connecting faces to be in the right place. I then had to mark and drill many holes in preparation to plug weld the tunnel in place. A month where i seemed to be taking the same photo over and over again. At least most of this is now in place and I have spent a day welding and sanding the plug welds for the floor and tunnel. This won't be coming apart again in my life time!
April 19
I have added photos of the passenger floor and rear transmission tunnel which has taken some time to get right. The rear transmission tunnel has had some nasty incidents resulting in it being a bit bent and twisted and I have replaced the floor so of course nothing is quite where it should be. Another week or so and I should have it sorted.
March 19
as the front page says I have had some distractions over the past few months but now back on the case and trying to finish off the drivers side door and guard fitting. The floor is now welded in place and working on the gaps and door closing action and am pretty happy where that is at. I have welded up the inner quarter panel on the B pillar and finished the top of the B pillar to close that out. I have also fitted a panel in to get the gap for the trim retaining material correct. I will have to add that photo later. I am now working on the rear guard and as you can see the retaining flange at the rear of the guard is not quite original. I like the slot to locate the guard with the bolts in position but have replaced the lowest slot with a more refined solution to the upper ones. The guard has seen some action and had some considerable panel beating so I am tidying that Up at the moment.
Late March
all the drivers side panels are in place including floor and guards. I have fitted the trim that I had removed but need to organise new trim as it is quite damaged but OK to get an idea of how it will go together. This is quite an achievement where one side is complete and I have pushed the car to the front yard to allow better access to the passenger side. All the panels are in place on this side but only tacked or riveted in place until I was sure the other side was all good so now it is a matter of welding. In the one day I managed to get both the inner and outer rear quarter panel mostly welded and I will move on to the A pillar and front guard over the next few weeks. Once that is completed it will be body off to finish weld underneath and correct some front mounting issues but the next stage is closing fast and I am planning on issues like trim lights and interior. 7 1/2 years down and maybe 1 year to go!
Dec 18
Well the year is nearly over and the progress has been sporadic but slowly gaining momentum. As you may have read on the front page I have been concentrating on the drivers side and have finally got to a happy place with this. I have cut and replaced the bottom of the front guard using a replacement panel from Kilmartin Sheetmetal. There is some detail in the front guard section of the body page. The panel buckled with the heat a bit and was damaged from multiple hits so I took it to Ray, my panel beater who fixed it up for me. I had to make some corrections on door gaps and A pillar mounting but now I have it close to right and I am welding the rear quarter panel in place and making the floor closing panel before I weld the floor into place. Christmas is closing in and I hope to get some time in the garage around this time if it is not too hot. Things are starting to take shape and I am now thinking about the time when I remove the body for welding underneath and the sandblasting phase.